#Moodle Tricks of the Trade – Creating a video based discussion activity

This is the 15th entry, in the Moodle Tricks of the Trade series.

I often run training for organisations on the use of Moodle, and a regular activity that I will introduce is the idea of creating a video based discussion (forum) activity. This for me is one of the best returns on investment (e.g. high educational benefit for minimal time/effort from teacher to set up) and a good ‘quick win’ especially when working with apprehensive or time strapped teachers.

Finding a video related to the topic being taught is relatively easy, and simply sharing a link to that video is again very easy, but there are a few downsides of just doing this:

  1. If the learner follows the link to the video; as well as the video, they will also get the various additional distractions that come with it – e.g. suggested videos, comments on the video (some of which may not be what you want learners easily accessing) and once a learner has been sent to YouTube or Vimeo, there is a risk they won’t come back.
  2. Just watching a video is actually a very passive form of learning.

So to combat the above issues, we do two things:

  1. We embed the video rather than linking to it. This will embed the video into Moodle, so the learners see the video, but not the distractions around the side.
  2. We get the students to do something with the video. This could be asking them to summarise the key point or points, or asking them to critique the video, or asking them to spot the mistake, or something else – just getting them to watch the video with a purpose, makes the process more active than before.

When using the forum activity in Moodle there are many settings and combinations of settings that can be used, and a lot of this will be down to personal preference and trial and error – however, once you have worked out the settings that you want – a really useful trick here, is to create a ‘template’ activity for yourself. This is basically a forum activity set up exactly how you want it. You set this to hidden, and I usually have it located at the very bottom of the course. When I want to add a new activity into a course, I simply duplicate this template, move it into the correct position, change the name and the contents and then make it visible. This is much quicker than creating one from scratch each time – and I don’t have to think about the settings, as these are already set.

The next post in this series will show how you can tweak the embed code if using YouTube.

Moodle Tricks of the Trade – Adding a Moodle calendar into an external application

This is the 14th entry, in the Moodle Tricks of the Trade series.

Moodle has a built-in calendar mechanism, which is often underused or incorrectly used – which is a shame as it can be a very powerful tool to help students to organise their time, their deadlines, any appointments etc.

Screenshot showing the Moodle calendar

What a lot of people don’t realise, is that it is possible to connect a Moodle calendar to another calendar application e.g. Outlook or Google Calendar – and as items are added to the Moodle calendar, these will then (within a few minutes) also appear in Outlook or Google Calendar. Each student or teacher has to make the connection themselves, but once set up, it should just run itself quite nicely, and overlay any Moodle items alongside other items in the other calendars.

This technique is particularly useful when you have students or teachers who are in different time zones, as the Moodle calendar will recognise the user’s timezones (as long as they are correctly set with their profiles), and show the items to them correctly based on that timezone.

The following video shows how to add the Moodle calendar to both Google and Outlook – note, this video will probably soon be out of date, as the different applications keep changing where to find things, but the principle will be the same, and will probably be applicable to other calendar applications as well.

Moodle Tricks of the Trade – Creating a 5 star rating scale

This is the 13th entry, in the Moodle Tricks of the Trade series.

In this post I will introduce a clever combination of basic techniques that can be used, to allow students to peer rate other students’ contributions, with a 5-star rating scale, familiar to many from various online shopping sites.

Image showing the 5 star scale as a dropdown

The first part of the process, is to create the scale – this has to be done by someone with admin rights on the site, and you basically add a scale that looks like the following:

☆☆☆☆☆,★☆☆☆☆,★★☆☆☆,★★★☆☆,★★★★☆,★★★★★

When this scale is then used within an activity, the 6 different options will appear in a drop-down menu, and the student chooses the option they want – as shown in the screenshot.

To create the stars, I used this website https://unicode-table.com/en/ and simply copied the white star and black star from here, and then manipulated them within Moodle to create the full scale. You may be able to simply copy the stars from above – but do check in case they don’t render properly on your Moodle.

Once the scale has been created, this can then be used by a teacher within a wide variety of activities e.g. forum, database, glossary etc. The key is, that if we want students to peer review each other, then we have to tweak the permissions for this activity to allow the role of student to be able to ‘rate’.

The video shows how to do this.

And then finally, it is thinking about how you actually use this – you could set completion to be based on students reaching a certain average star rating, or the teacher could set a final (separate) grade manually but using the star ratings as part of their decision-making process.

Moodle Tricks of the Trade – Using the Database activity to create research activites

This is the 12th item, in the Moodle Tricks of the Trade series.

The Database activity in Moodle, is and has been a core activity type for many years, but is something that is seldom used – which isn’t surprising as it isn’t the simplest activity type to set up – but it can be very powerful if you can work out how to use it.

The database has many uses, but in this example, the basic principle is that you set up a student-based research activity, where each student will research something, and then share their findings with the rest of the group. e.g.

  • If you were teaching psychology, each student would research a theorist
  • If studying history, each student would research a different ruler
  • If studying chemistry, each student would research a different element

When setting up the activity, you specify the fields you want them to populate, e.g. using the chemistry example above, you may ask them to find the following:

  • Name of element
  • Atomic Number
  • Atomic Weight
  • State at room temperature
  • Key properties
  • Uses

The image below shows an entry screen from a database activity set up to research different monarchs.

Screenshot of a database entry screen

The idea is that the students get to research one (or more) items, but they get the benefit of also seeing the other student’s findings. There is then an option to allow comments on entries, or ratings (e.g. the students’ rate other students entries), and the teacher can grade the entries (e.g. give the students a grade) – which can be very powerful.

There are 5 steps to setting up a Database Activity:

  1. Add A ‘Database’ activity to the course, and choose the desired settings for the activity.
  2. Add the chosen fields for the activity
  3. Edit and save the templates.
  4. Test that it works by adding an entry.
  5. Edit the templates if necessary.

The following video takes you through this process. In the video, the formatting of the templates is kept very simple. In reality, as you become more proficient in editing content within Moodle, you can spend a lot more time formatting these areas to make them both look and work better for you.

Moodle Tricks of the Trade – Using the Scheduler to book appointments

This is the 11th item, in the Moodle Tricks of the Trade series.

Moodle is obviously great as a teaching and learning tool, but it can also be really useful as a tool to manage mundane logistical elements, saving both the teacher and student time. When I was a teacher, one of the things that frustrated me most, was if a course had a requirement of a 1:1 element – the process of booking the 1:1 slots with the students would take hours and hours, and ultimately not work, but with the scheduler plugin, this can manage the whole process for you, allowing you to very quickly set up the bookable slots, which the students can then book (and once one student has booked a slot others cannot) – and if students need to change their booked slot, they can simply go back into the item within Moodle, cancel their booked slot, and rebook another one.

Laptop where the screen is covered in post it notes

The mechanism can also:

  • Add the booked items into both the student and teacher calendar.
  • Send email notifications a certain number of days before the meeting, or on the morning of the meeting.
  • Be set up for small groups of people to book slots.
  • Be set up to allow for repeat bookings.
  • Be graded by the teacher (e.g. if the meeting was a Viva or a presentation).
  • Have an area for notes to be recorded against the meeting.
  • Export the information as a csv file.

This technique could also be used to manage things like slots at parent/carer evening, small group tutorials where you can only have a small number of students at a time, careers interviews with the central careers team etc.

Moodle Tricks of the Trade – Course Completion based on different activities for different people

This is the 10th item, in the Moodle Tricks of the Trade series.

Regular users of Moodle, will be aware that you can turn on Activity Completion, and then certain activities can be tracked so the teacher can see who has or hasn’t completed each of the activities. There is then a feature within Moodle, called Course Completion where you can specify what criteria have to be met, for the whole course to be complete, and there is a range of variables that can be included here, including the completion of certain activities.

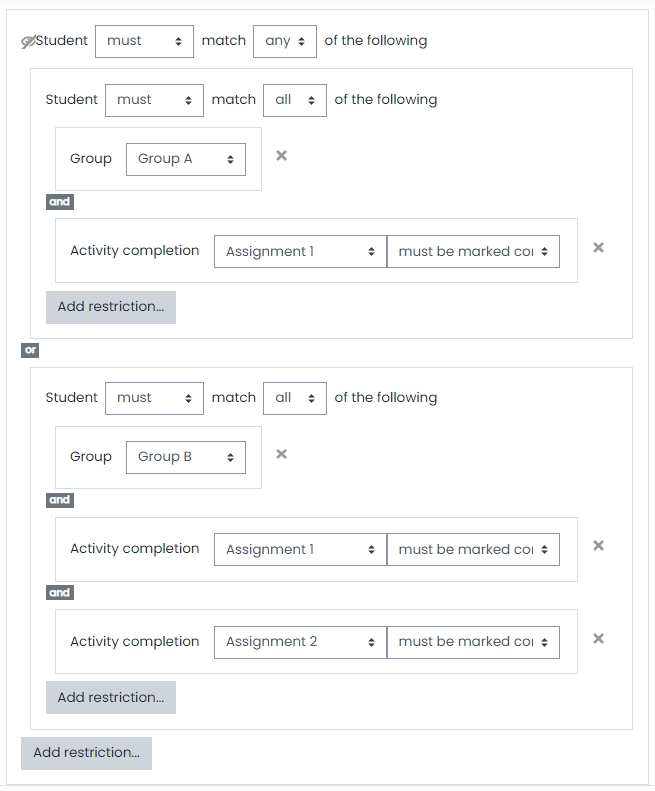
Screenshot showing the restriction sets used to achieve the objective.

However – the basic course completion mechanism, does not account for a situation where some students have access to some items, and other students have access to different items – but you want the course completion to track correctly based on what the student can see.

This has puzzled me for many years, so I am very pleased that there is a new plugin out there called ‘Pulse‘ which although not specifically designed for this purpose, can be used to achieve it. The key principle of the Pulse activity is that it is based on trigger items – and when those triggers are met, it does something. So what I am doing here, is setting up a ‘Pulse’ within the course, on which I use restriction access settings (as shown in the image – click on the image to enlarge it), and in particular restriction sets, to set the different completion options for the different groups of people in the course. Once these conditions are met, the ‘Pulse’ simply appears – the clever part, is that the Pulse itself can be tracked, and the tracking is marked as complete when the item becomes visible to the user. So within the Course Completion options, rather than tracking the items directly, I simply track the Pulse item.

The following video shows how this is achieved.

This could be a very powerful option, with an almost infinite number of combinations of settings that could be applied, and when you think that you could have multiple Pulse items within a course, with one triggering another, then all sorts of things could be achieved.

There is a list of other possible uses of the Pulse at https://docs.moodle.org/311/en/Pulse

Moodle Tricks of the Trade – Using the ‘Journal’ Activity

I have received many positive comments from people, who found my ‘Moodle Tricks of the Trade‘ series very useful, and as such, I have been asked to continue the series.

This post looks at the Moodle Plugin called ‘Journal’. This is not a particularly well-known plugin, but is one that I use widely and love, for its simplicity both for teachers and students.

What the plugin allows, is for a teacher to set a single question, which the students answer in a single essay type box – the teacher can then view all the answers from their class or group on a single screen (shown in the image), and give feedback (and grade if necessary) on that same single screen, making it a very quick activity to use. The journal is designed so that the students can update their response at any time, which is attractive in many situations, but does present limitations for other uses – e.g. if using this as part of assessment, it would be possible for the student to change their response after their work has been graded, so you wouldn’t have a full audit trail for verification purposes etc.

Screenshot showing the student responses on the same screen, below each is the box where the teacher can give feedback and grade their reponse.

I have used this in many ways, sometimes the standard ‘Assignment’ activity is overkill when all you want is a simple response to a simple question, so the journal works better there, I sometimes use this at the end of each topic, where I ask the students to identify the key points from that topic, or to flag up any areas they found tough or want to go over again.

This video goes through the process of setting up a Journal activity.

Moodle Tricks of the Trade – Hiding user profile fields

This is the eighth (and at present final) post in the series: #Moodle Tricks of the Trade

Moodle has various fields that appear in a user’s profile by default, most of which make sense such as firstname, lastname, email etc. But there are many that appear within the profile that you may not need e.g. AIM ID, Yahoo ID, etc. and from a GDPR/Data protection perspective, we should only be storing the personal data that you need, and we shouldn’t be storing data that we don’t need, so my view is to turn these fields off. I haven’t found a way of actually disabling these fields (if there is a way, could someone please tell me), so instead  I simply hide them, so although they are there, the user cannot see them, and therefore cannot enter any data into them.

As well as meeting Data Protection requirements, this also simplifies the user profile screen as it reduces the number of items they can fill in, which increases the chances of them filling in the other more useful items.

These changes have to be applied by an admin, and obviously, require careful consideration as to which you need and which you don’t, and if applying these retrospectively, I personally would wipe any data that is stored in those fields, before I hide them.

Moodle Tricks of the Trade – Embedding H5p activities into other Moodle areas

This is the seventh post in the series: #Moodle Tricks of the Trade

Moodle itself has a wonderful array of different resource and activity types that can be deployed, but in recent years the integration of H5p into Moodle, has extended this further. H5p allows a user without high levels of technical skills, to use templates to create rich web-based interactive content, most of which has high levels of accessibility, and the output is HTML5 so will work on most devices (including phones) and browsers.

Screenshot showing the H5p items in a Moodle course

If you haven’t seen H5p before, it is worth looking at the examples on https://h5p.org/content-types-and-applications. some of the activity types, don’t have much use or value in my opinion, but some of them are very good. The quiz activity is not as powerful as the Moodle quiz, but it is visually better looking, and for a new user is easier to create, so I will sometimes use the H5p quiz and sometimes use the Moodle quiz depending on the situation, but the really clever thing with H5p, is that it can be embedded into other Moodle items, so if I am using the Book resource, that contains a number of pages of information, and I want to check understand or reinforce the learning with a simple quiz or activity, if I use the Moodle tools, I have to link out to another activity, and then link back to the book, which gets messy and confusing for the learners – whereas with H5p, I can simply embed the activity into the page within the book, so it becomes a much more natural flow for the learner.

Note: There are two different ways that H5p may be added to the Moodle, if the Moodle is a newish version, then the activity may appear as ‘H5p’ in the list of activities. If the Moodle is older, then it may appear as a thrid party plugin under the title of ‘Interactive Content’ – the tutorial covers both situations, but important to know which applies to you when watching it.

And as per previous tutorials in this series, this is another way that we can vastly improve the user experience in Moodle, and in doing so increase the educational value of the VLE.

Moodle Tricks of the Trade – Using ‘Filter Codes’ to personalise by role

This is the sixth post in the series: #Moodle Tricks of the Trade and in the previous 2 tutorials, I have shown how to: add buttons to a course page, and how to use the Filter Codes plugin to personalise a course.

In this tutorial, I am going to combine those 2 techniques to show different buttons to different people based on their role or roles

I will often state that the ultimate aim is for ‘people to see what they need to see, and not see what they don’t need to see’. This simple but clever technique works towards achieving that objective, and by improving the user experience, we can really improve the effectiveness of how we use our Moodles.